1)General and general functions.

There are many raster databases on the market. One very well known is Google Maps which provides us with a photo Ortho on the whole world.
Many others exist, most are paid and require a key to use.

This module allows to mount this type of database as a background and thus allows to superimpose our vector maps on photo for example.

A WMS database is used by making requests of the type: I want such raster layer in this rectangle and under such coordinate system.
http:Server.fr/ortho?SERVICE=WMS&REQUEST=GetMap&LAYERS=ortho_2016&FORMAT=image/jpeg&SRS=EPSG:2154&BBOX={BBOX}&WIDTH=512&HEIGHT=512
The server thus calculates an image of this rectangle according to your criteria.

A WMTS base is a tiled base already prepared. You load already existing images (tiles). The advantage is that the server doesn't have to do any calculation and it's often faster.
The disadvantage is that you are imposed a cutting and a coordinate system.
http://server.fr/wmts/ortho/lambert93/{TileMatrix}/{TileCol}/{TileRow}.jpeg

In WMS mode, PMS3D works with a notion of tile. Each tile is stored in buffer files in order not to ask the server again the next time they are used.
Thus, we gain a lot of efficiency.
So, even in WMS, it is necessary to define a tiling system ({TileMatrixSet} and {TileMatrix}) and a system of coordinates in the files ".WMTS".

2)The WMS/WMTS property files '.WMTS'.

This file format '.WMTS' is specific to PMS3D software. It contains all the information to load a WMS or WMTS layer.
We could have worked directly on the XML property files requested on the server but, as these requests are formatted in a very diverse way, are either incomplete or too complete and require a lot of questions to select the layer, the style, the format and the coordinate system to decide what we want, I preferred to build an intermediate file that contains what is necessary to load a layer without any questions. Additional parameters like fade, transparency, login that are not in the WMS standard are added.

Details of this '.WMTS' file:

'WMTS;isWmts(0 for WMTS,1 for WMS);WMS version
WMTS; 1;1.0.0

'LAYER;Name;Title;EPSG;FORMAT
LAYER;GMaps_ortho;Orthophotographie+Textes de GMAPS;-180.0000000000,-85.0511287798,180.0000000000, 85.051129;EPSG:3857;image/png

'the "BBOX" is in geographic coordinates and is used to set the boundaries of the Autocad image (if those boundaries are suitable)
BBOX;-180.0000000000,-85.0511287798,180.0000000000, 85.051129

'Impose your autocad layer name (if nothing we take the one of the Layer above):
MYNAME;Layer_name_and_layer

'Tile or WMS query URL. Keywords must be completed by the software:
'{Layer},{TileMatrixSet},{TileMatrix},{TileCol},{TileRow},{LatLongCenter}
URL;https://mt1.google.com/vt?lyrs=h&x={TileCol}&y={TileRow}&z={TileMatrix}</em></span>

'Security INTERNET Access
'The USERAGENT can be changed and can be an element to provide to the data provider
USERAGENT;PMS3D_WMS_XML
LOGIN;demo;Password

'Display the image:
'Make the RGB color(255,255,255)
TRANSPARENT;255;255;255
'Transparency of the other colors at 50% ( 0 < FADE 100)br> FADE;50

'
'TileMatrixSet;Name of this tiling definition
TileMatrixSet;webmercator
'TileMatrix;ID;Scale;LeftCorner;TileSize;MatrixSize
TileMatrix;00;5. 590822640290e+08;-20037508.3428,20037508. 3428;256,256;1,1
...
TileMatrix;21;2.665911979810e+02;-20037508.3428,20037508.3428;256,256;2097152,2097152

3)The WMS/WMTS interface of PMS3D.

This function is accessed through the command: PMS_WMTSOr through the BASIC Palette Menu :


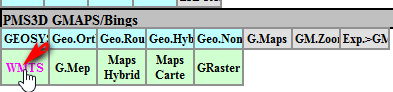
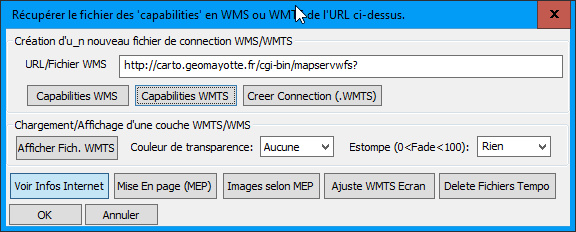
(B01) Enter a URL or .XML file to be processed by functions B02 through B04.
(B02) Get all WMS type information related to the above URL (Provided they are retrievable).
(B03) Get all the WTMS type information related to the above URL (Provided they are retrievable).
(B04) Create a connection file from the above URL or .WML file.
This file can be adapted to your needs by adding transparency for example. (B04) Putting a layer in the background by selecting a ".WMTS" file.
It is also possible to drag this ".WMTS" file in the ".PXREF" management dialog.
A PXREF concerning this background is created. This allows to make it visible or not or to unload it.
(B06)(B07) Force or not the transparency and the fade at the next .WMTS loading.
(B08) When there are connection problems, it is interesting to have info on what is sent to the server.
(B09) Insert a layout. For serial duplication, use the ORTHO module.
(B10) For the selected MEPs, create .TIF images of the background.
(B11) Crop/Limit WMTS images. It is possible to clip these images (ORTHO module). Useful to not have too much zoom.
(B12) Delete all temporary images (bufferization of WMS/WMTS tiles). The interest is to recover disk space.